
Here's the promised part two on how to make your own knitting bag. I've never made a bag like this before so all my instructions are from what I worked out by looking at other bags. So you may have a different (and likely more logical and simple) way of doing things so ignore me on those bits. And do post your method - I'd love to hear!
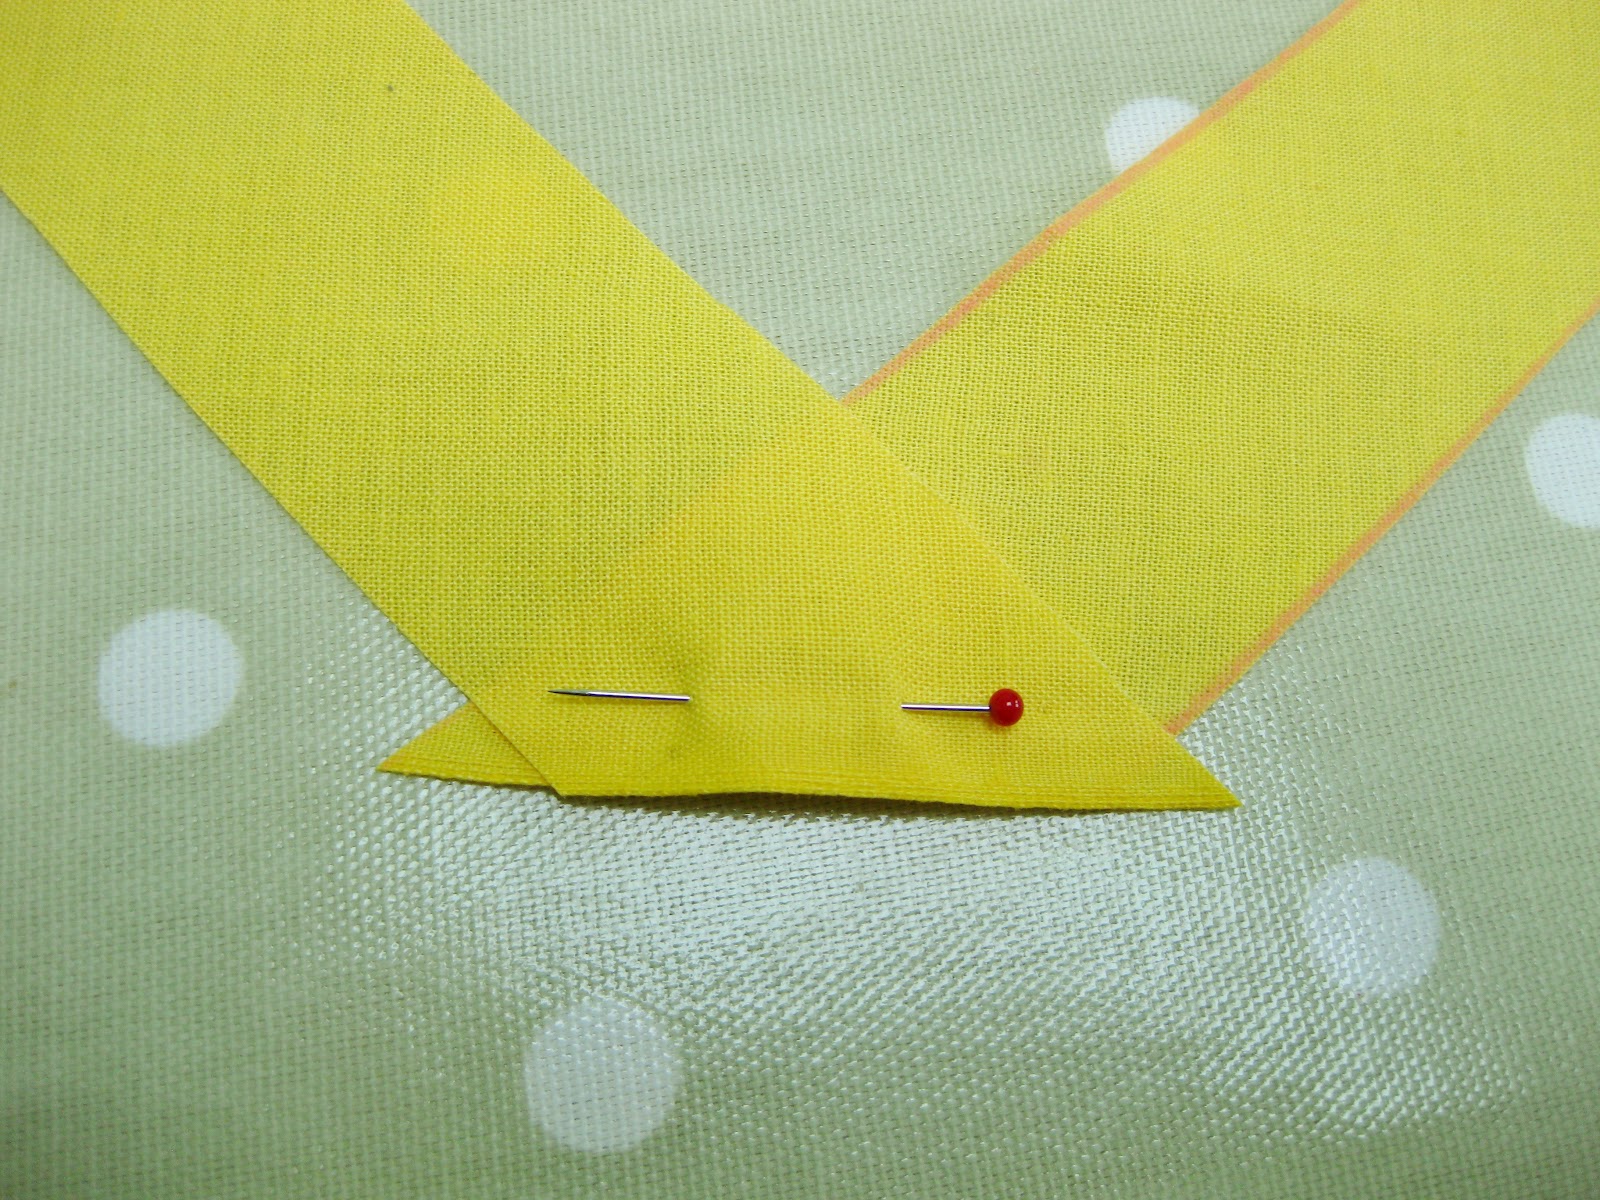
First, make your bias binding for your piping. Skip this section if you know how to do this. I have a foolproof method for finding the bias using a simple piece of kit. Some people use bias binding makers; I have no idea how to use one of these. Instead, get hold of a set square or 45° (or even a protractor) triangle ruler. If you don't have one of these I'd recommend getting hold of one they're also useful for making 90° angles, so cutting straight across the weft threads, say if it was cut wonky off the bolt at the fabric shop. I bought a set with a large ruler, large 45° and 60° triangle rulers and a large protractor for under £5 and it was money well spent.)Simply line it up your triangle with the warp threads, you can use the selvedge if you like, and then rule along the diagonal edge. Then I use an ordinary 30cm ruler as it's about the right width for bias binding to make further lines--

Sew these strips together, pinning them at 90° angles--

Press the seams open. Lay your piping down the middle of the wrong side and pin the fabric together perpendicular to the cord. With a piping foot, sew close to your piping, but leaving a little breathing space - and don't sew into the piping! Here are the diagrams for reference again--


Cut medium to heavy weight interfacing (depending on the fabric you are using) for pieces except piece 5. Using a steam iron press onto wrong side of fabric.
Mark the centre point of the length and height of piece 1. Mark the centre point of the length of pieces 3 and 4.
 Take two small square scraps of your fabric and press one edge for a quarter inch seam allowance. Pin the folded edge over the ends of your zip so that they will fall about 1cm within the finished length of your bag. (The photo is a close up after the next step but you get the idea.) So for my bag I had 38cm of exposed zip for a finished length of 40cm. Sew these onto the zip by sewing perpendicular and to the zip close to your folded edge. You may have to turn the wheel by hand as even with a long stitch length the needle can hit the teeth.
Centre zip onto piece 2b and pin. Sew using a zip foot; no need to get really close to the teeth. A little strip of exposed zip tape looks quite nice when you use the big chunky zips. Press flat, being careful not to put your iron over the teeth - they'll melt so watch out. Now line up the raw edges of piece 2a with 2b and pin onto zip and sew in the same way. Together this piece is now piece 2.
This is how things look so far--

Mark the centre points of the height and length of piece 2.
Now take your two 2b lining pieces. Turn the above to the wrong side. Pin one of the lining pieces to seam on what was piece 2. Now sew about 3mm outside of where you sewed the zip onto the outside pieces.


Now do the same but pin and sew the other pocket piece onto the other side of the zip. Press. Then using a 1cm seam allowance sew the two pocket pieces together, going up as far as you can toward the zip.


 Now attach the piping to pieces 1 and two with your zip/ piping foot. Clip the piping at 1cm intervals round the corners just before you get to them. Leave about 2" - 3" unsewn at the bottom in the middle. Then cut your piping leaving a 1" overlap. Unpick the stitching on the piping about an inch on each end. Then pull out the exposed ends of your cord and trim a half inch of each so that they lay flat and do not overlap but touch each other. Then fold one exposed end of your piping fabric over and finger press. Lay the other side of your fabric with the raw edge inside this one. Push the cord into the channel and using your thumbnail nicely smooth it in so those open edges don't fan out. Pin perpendicular to the piping Now sew along to close up this final part of the piping.

Now sew the longer zip onto pieces 3 and press.

Attach piece 4 onto the open end side of the zippered pieces 3 (the one you see in the picture). Press seam towards piece 4. Topstitch. Lining up the centre of the long side of piece 1 and the centre point of zippered piece 3 just check that the seam is in line with your centre point and that the on your raw edges of the zippered and bottom piece extend 1.5cm respectively from the centre point of the height of your bag. If not work out how much you need to add or subtract from your seam allowance Repeat sewing and topstitching for the other side.
Starting at the centre point of the shorter side of piece 2, wrong sides together, start sewing one side of piece 3 on. You will be catching the pocket lining as well so make sure this stays flat and smooth. You need to decide which direction you want the zip to open in, i.e. left to right or right to left. Clip seam allowance of pieces 3 and 4 as you get to the corners to make sewing easier. Also try to stay as close as possible to the piping without sewing through it. On the corners you will need to keep the needle down, lift the foot and rotate.
Then do the same for piece 1 and the other side of your zippered pieces 3 and piece 4. Trim down the seam allowances.
Now for the handles. With wrong sides together sew one piece of interfaced fabric and one piece of contrast fabric of pieces 6 together using a 1/4" seam allowance. Sew both long sides and one short side together. Clip corners diagonally and turn through. Press. Repeat. On the open ends fold the raw edges inside about 1/4".
Determine how far apart you want the handles to be. I made mine 11cm apart to the outside edges. Centre over your pieces 1 and 2 with the contrast side underneath. I doubled the ends over about 2cm for extra stability. Place the fold 2.5cm from the piping and push the seam allowances in the bag towards the zip. Sew a rectangle and cross through the diagonals being careful not to catch the piping.

Next time I'll finish by showing how to make the lining...
Alix xxx
First, make your bias binding for your piping. Skip this section if you know how to do this. I have a foolproof method for finding the bias using a simple piece of kit. Some people use bias binding makers; I have no idea how to use one of these. Instead, get hold of a set square or 45° (or even a protractor) triangle ruler. If you don't have one of these I'd recommend getting hold of one they're also useful for making 90° angles, so cutting straight across the weft threads, say if it was cut wonky off the bolt at the fabric shop. I bought a set with a large ruler, large 45° and 60° triangle rulers and a large protractor for under £5 and it was money well spent.)Simply line it up your triangle with the warp threads, you can use the selvedge if you like, and then rule along the diagonal edge. Then I use an ordinary 30cm ruler as it's about the right width for bias binding to make further lines--

Sew these strips together, pinning them at 90° angles--
Press the seams open. Lay your piping down the middle of the wrong side and pin the fabric together perpendicular to the cord. With a piping foot, sew close to your piping, but leaving a little breathing space - and don't sew into the piping! Here are the diagrams for reference again--


Cut medium to heavy weight interfacing (depending on the fabric you are using) for pieces except piece 5. Using a steam iron press onto wrong side of fabric.
Mark the centre point of the length and height of piece 1. Mark the centre point of the length of pieces 3 and 4.
 Take two small square scraps of your fabric and press one edge for a quarter inch seam allowance. Pin the folded edge over the ends of your zip so that they will fall about 1cm within the finished length of your bag. (The photo is a close up after the next step but you get the idea.) So for my bag I had 38cm of exposed zip for a finished length of 40cm. Sew these onto the zip by sewing perpendicular and to the zip close to your folded edge. You may have to turn the wheel by hand as even with a long stitch length the needle can hit the teeth.
Centre zip onto piece 2b and pin. Sew using a zip foot; no need to get really close to the teeth. A little strip of exposed zip tape looks quite nice when you use the big chunky zips. Press flat, being careful not to put your iron over the teeth - they'll melt so watch out. Now line up the raw edges of piece 2a with 2b and pin onto zip and sew in the same way. Together this piece is now piece 2.
This is how things look so far--

Mark the centre points of the height and length of piece 2.
Now take your two 2b lining pieces. Turn the above to the wrong side. Pin one of the lining pieces to seam on what was piece 2. Now sew about 3mm outside of where you sewed the zip onto the outside pieces.


Now do the same but pin and sew the other pocket piece onto the other side of the zip. Press. Then using a 1cm seam allowance sew the two pocket pieces together, going up as far as you can toward the zip.


 Now attach the piping to pieces 1 and two with your zip/ piping foot. Clip the piping at 1cm intervals round the corners just before you get to them. Leave about 2" - 3" unsewn at the bottom in the middle. Then cut your piping leaving a 1" overlap. Unpick the stitching on the piping about an inch on each end. Then pull out the exposed ends of your cord and trim a half inch of each so that they lay flat and do not overlap but touch each other. Then fold one exposed end of your piping fabric over and finger press. Lay the other side of your fabric with the raw edge inside this one. Push the cord into the channel and using your thumbnail nicely smooth it in so those open edges don't fan out. Pin perpendicular to the piping Now sew along to close up this final part of the piping.
Now sew the longer zip onto pieces 3 and press.

Attach piece 4 onto the open end side of the zippered pieces 3 (the one you see in the picture). Press seam towards piece 4. Topstitch. Lining up the centre of the long side of piece 1 and the centre point of zippered piece 3 just check that the seam is in line with your centre point and that the on your raw edges of the zippered and bottom piece extend 1.5cm respectively from the centre point of the height of your bag. If not work out how much you need to add or subtract from your seam allowance Repeat sewing and topstitching for the other side.
Starting at the centre point of the shorter side of piece 2, wrong sides together, start sewing one side of piece 3 on. You will be catching the pocket lining as well so make sure this stays flat and smooth. You need to decide which direction you want the zip to open in, i.e. left to right or right to left. Clip seam allowance of pieces 3 and 4 as you get to the corners to make sewing easier. Also try to stay as close as possible to the piping without sewing through it. On the corners you will need to keep the needle down, lift the foot and rotate.
Then do the same for piece 1 and the other side of your zippered pieces 3 and piece 4. Trim down the seam allowances.
Now for the handles. With wrong sides together sew one piece of interfaced fabric and one piece of contrast fabric of pieces 6 together using a 1/4" seam allowance. Sew both long sides and one short side together. Clip corners diagonally and turn through. Press. Repeat. On the open ends fold the raw edges inside about 1/4".
Determine how far apart you want the handles to be. I made mine 11cm apart to the outside edges. Centre over your pieces 1 and 2 with the contrast side underneath. I doubled the ends over about 2cm for extra stability. Place the fold 2.5cm from the piping and push the seam allowances in the bag towards the zip. Sew a rectangle and cross through the diagonals being careful not to catch the piping.

Next time I'll finish by showing how to make the lining...
Alix xxx


