Sunday, 8 July 2012

A quick tip for sewing darts

After my five-day foray into the world of custom pattern drafting with the wonderful Dennic Lo, I have learnt so much that my brain feels like it will explode. In a tentative step to tell you about everything I discovered, I am starting with a baby step. Dennic showed us a really easy (and now I know it, obvious) way to sew perfect darts.

How do you normally sew darts? I am in the chalk camp. I mark the point with a white pencil (on the wrong side of the fabric) and the mid way points, and notch the raw edge where the dart ends. Then I draw the sewing line and pin carefully. This method works for sturdy fabrics (eg calico, medium weight cotton, denim). The drawback is that for slippery fabrics which distort easily, it is impossible to draw the line in the right place. The pressure of the chalk or pencil tends to pull the fabric out out of shape. So what to do?

This is the clever bit. Firstly, you don't need a pencil. Dennic showed us a tool I had never seen before: a bradawl, or an awl for short. It looks like a small screwdriver and all it is is a rod of metal that tapers into a fairly fat point--

A bradawl
This point is designed so that when you push it into fabric it pushes the weave open to create a hole. If you just press the hole with your fingers it'll close up. Notch the dart position at the raw edges. Then use a strip of card with a straight edge (cut one side wavy to ensure you only ever use the straight side). Fold your dart and match the notches. Line up the fold to the point, put it under the foot of your machine and bring the needle down so it doesn't move. Lift the foot of your machine, whip the piece of card towards the unfolded side of the dart. Check the notches are still matching, put your foot down and sew! Try not to sew through the card as this will blunt the needle faster.

You have a perfect dart without the trouble of pins and fiddly chalk lines!

Alix xxx

Sunday, 1 July 2012

LCF: Customised pattern cutting & fitting 1

© 2012 University of the Arts London
Tomorrow is the start of a very exciting week for me. This week I have signed up to one of the London College of Fashion's short summer courses. I've got my materials from the list sent to me (although I think that for the rather hefty sum paid they could at least include 2H pencils on the house!) and I'm ready to take on customised pattern cutting! Whoop! I shall report back on what I learn, and what I draft. 

The details on LCF's website state that you can make a dress, skirt, shirt or trouser block. Now I think a skirt block is so simple it's hardly worth the money. And I have a dress block. So... do I go for a trouser or a shirt block? My thrifty side is shouting 'shirt' very loudly, as this seems like the best value for money. But my practical side is saying that I'll get more use out of a trouser block. Unless shirt blocks are adapted to make jackets? Then that is value for money. I shall ask tomorrow, but I think I'm leaning towards trousers. 

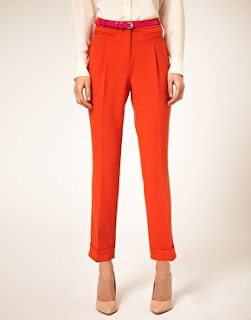
I am also hoping to get some good info on adapting my block to different styles. I want to leave with a pattern for some mid-rise cigarette trousers, such as these--

ASOS Belted Peg Trouser with Turn Up
And I have just seen that our teacher, Dennic Chunman Lo is a freelance pattern cutter for Asos - maybe he designed these! 

Tomorrow it will be hard to contain my excitement and nerves as I am placed in a room of fellow sewing-crazy people (I guess it's a bit like the first day of school). Surrounded on all sides by my own kind! I will endeavour of course to remain demure and studious although I am worried I will be starstruck when I meet Dennic and will call him something ridiculous like 'your highness' and then blush and all my classmates will label me the weird one.

Before this gets out of hand, that's all for now folks!

Alix xxx

Graduation dress

After a short-lived celebration of the fact that I might never have to sit an exam again, I am returning in October for another round of the dreaded finals, this time in another subject. Gutted that I wouldn't get to graduate along with the rest of my friends, I was still able to get in on the action by going to the bf's graduation. And so I needed a dress. 

One of the most satisfying things about sewing is when you see that long cherished stash finally rise to glory in a project. Last summer I bought this wonderful fabric at Liberty in London:


I had thought I could make some lovely summer pyjamas, but why waste such good fabric on something noone ever sees, apart from me! It had to be a pretty summer dress. There's a little independent clothes shop in Cambridge called Lilac Rose which I cycle past nearly every day which often has girly summer dresses made up in floral and geometric patterns: after months of looking in the window the desire for a floral dress has piqued me! And of course, I had to put a peplum on it--

By his own admission, the bf is, at best, a mediocre photographer.
Here I am almost about to laugh, hence the strangely tight smile!
The neckline is inspired by Casey's tutorial for a 50's sundress which I look at weekly because it is so cute - I can't get enough of it!

The wind is lifting the peplum and showing it off nicely!
I wanted a full peplum so I made it out of a circle of fabric, but in two halves so there was a break in the front for the button plaquet. There is a centre back zip and the bodice is underlined with white cotton.


I trimmed the seam allowance to the zip tape and then catch stitched the seam allowance and tape to the underlining.

The button and fake plaquet were made with a long strip of interfaced white cotton (same fabric as the underlining). I turned under a 1/4" seam allowance on each edge, stitched, then stitched the lace on top. Then I sewed on top of this stitching line to attach it to the dress. I put the buttons on once I had put the bias tape on. 19 buttons is a lot of buttons to hand sew!


The Liberty tana lawns are really light, and even with this busy pattern, the fabric was a little transparent, hence why I chose to underline the bodice. I didn't bother for the skirt because the peplum created a double layer of fabric around the critical must-not-be-transparent area (i.e. one's kecks). Because the fabric is so light, it was very easy to hem--

♥ my new overlocker
I just overlocked the edge and turned it under. This was particularly handy for the peplum hem. I find that getting a smooth, unrippled hem on curved pieces, especially on smallish circle pieces, is difficult. All that mixing of grainlines (sometimes you're sewing on the bias, sometimes dead straight along the weft and warp threads) can make it tricky to ease the turned allowance into the curve.

Hopefully I can make use of my new summer dress on my trip to France, assuming that the weather isn't as changeable as it is in Cambridge!

Alix xxx